Cupid’s Blueberry Cheesecake Smoothie

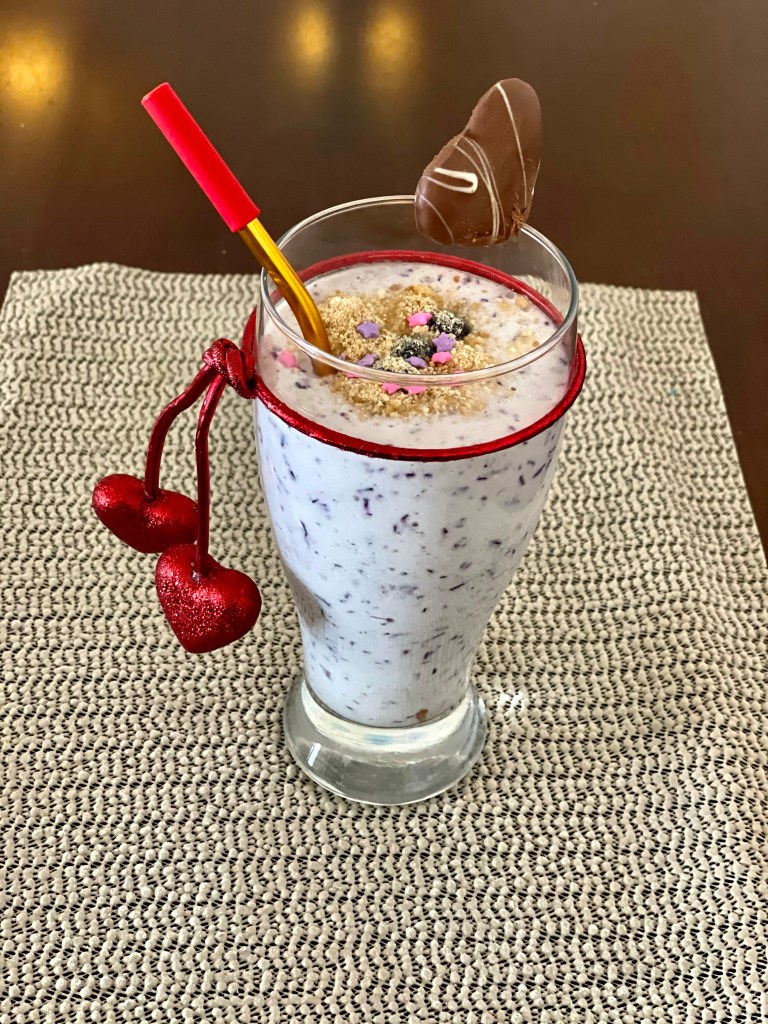
If you are looking for some simple yet healthy treat for your kids on or around Valentines day, this blueberry smoothie just fits in right. While being a healthier alternative to shakes, this smoothie is also luxurious as it comes with the goodness of cheesecake. Your kids will feel they are having a treat while having something so healthy. A win win!

The ingredients are fresh and unprocessed right from your refrigerator. Plus, greek yogurt and cream cheese make it high in protien. The blueberries give a sweet taste but if you want it to be a li’l more sweet, you can use any sweetener of your choice.

As sweetener, I added a spoon of honey into it. You can alternatively add brown sugar or white sugar.

I used unflavoured greek yogurt; you can also choose vanilla or any other flavored yogurt. I used Philadelphia cream cheese option as I find it quite a tastier alternative of cream cheese.

Milk can also be altered to your choice, like a normal whole milk or almond milk or any other milk. I used normal whole milk.

Blueberries used in this are frozen since they make the smoothie thicker and your smoothie is more smoothie like rather than a shake like. You can also add ice while blending to give a thicker texture. Just throw into the blender with other ingredients while blending and it turns fine.

Ingredients:

1/2 cup greek yogurt
1/2 cup frozen blueberries
1//4 cup cream cheese
1/2 cup milk
1 tsp honey

For topping and decoration:
Sprinkles
Cracker crumbs
A heart shaped cookie Few blueberries

Directions:

1. In a blender, blend all the ingredients that is blueberries, greek yogurt, cream cheese, milk, honey, and blend it until smooth.

2. Pour it into a tall glass and sprinkle cracker crums, blueberries on top of it.

3. Carefully make a slit in the heart shaped cookie with a knife and insert in the glass.

Enjoy!

Energy Bars

If you are looking forward to some make ahead quick breakfast ideas, then these energy bars are something not to be missed upon. These are super easy to make and in only 3 steps.

These energy bars are our family’s favorite. I prefer making it in advance and storing it in an airtight container. They are a savior as quick to-go breakfast on busy mornings or a filling snack in the evenings. They remain nice and crisp for a good amount of time as well.

These bars are not only wholesome, but also highly adaptive and can be varied with a number of ingredients. I find that peanut butter gives a good binding to the ingredients as compared to almond butter. You can also add whipped frosting of any flavors, just to give an additional twist of taste.

Ingredients:
2 cups rolled oats
2/3 cups peanut butter (or any other nut butter)
I cup nuts such as almonds, walnuts, pistachios, dry dates etc.
2tbs flax seed
¼ cup honey
Chocolate chips

Directions:

1. Take rolled oats, dried fruits, flax seed powder, peanut butter, almond butter and honey in a dish.


2. In a chopper, coarsely grind all the ingredients.


3. Now add choco chips to the mixture.

4. Next, take a raised baking dish, firmly press the mixture into it. Cover it for 2hrs or until firm.

4. Now using a knife slice it into bars. Store it into an airtight container.

Waffle Pops recipe

If you are looking for a delicious crispy yet chewy waffle recipe, you are at the right place. These waffles call for just the perfect treat for your kiddos. For mine, it was a heavenly delight and he was over the moon when I made these.

I have been recently obssesed with my mini Dash waffle maker. The waffles are perfect in size if you are trying to eat a limited portion plus the texture too is perfect. These are not as soft as the Belgian Waffles and the crispiness is also particularly distinct. It will not be wrong to say that this mini device can make a massive impact in any kitchen.

The batter used is close to the pancake batter, just that it takes melted butter in addition. And of course, the measurements for batter also need to be precisely followed since the change in batter consistency will lead to variable results.

Ingredients:

1 cup all purpose flour
1 tbsp sugar
2 tsp baking powder
1/4 tsp salt
1 large egg
1 cup milk
2 tbsp softened unsalted butter
Popsicle sticks

For waffle pop coating

1 cup chocolate frosting
1 cup vanilla frosting
Water

For topping

Marshmallows
Chocolate sauce
Sprinkles

Directions:

1. Mix together flour, sugar, baking powder and salt in a medium bowl.

2. Whisk together milk, egg and melted butter in a separate bowl. Add the wet ingredients to the dry mix until nicely combined.

3. Add 2 tbsp of batter to the waffle maker and cook for 6-4 minutes, it will turn golden brown on both the sides.

4. Vertically insert popsicle stick through each waffle while warm.

For Waffle Pop coating

1. Mix chocolate frosting and vanilla frosting separately with water in a medium bowl.

2. Holding the popsicle stick, dip half from the sides of each waffle into a bowl.

3. Now top with sprinkles, marshmallows and chocolate drizzle.

Notes:

1. If you substitute ingredients, they may not work the same way.

2. Units of measure shouldn’t be altered.

3. When whisking, don’t overwhisk else the waffles tend to lose their crispiness and get softer.

4. Different waffle makers give different results, for example a Belgian Waffle maker will make relatively softer waffles, so do a research before buying one.

DIY Snowman

Who doesn’t love a snowman?! After all these creatures are super cute to behold. And what if one can be found in one of the corners of your house; that too a one which doesn’t melt😀!

This is one of the cutest craft I’ve done in recent times. Although, it might look difficult but it is one easy thing to do, and believe me kids will be in the middle of it too!

Yarn is such a versatile craft material. I so very much wanted to do a yarn craft for a very long time. The balls will require yarn in ample, if you are making it of a bigger size. Popping up the balloon and getting a stiff yarn ball was the most favorite part of the process. As far as accessorizing and doing up the snowman is concerned, you can be highly adaptable with it and use felt, buttons etc. instead of the art paper.

Let’s get into making!

Materials required:

White yarn
2 Balloons
1 bottle of Tacky glue (4 ounce)
Water
Bowl for mixing
Glitter (optional)
Art paper (blue for hat, black for eyes & smile, orange for nose, red for buttons)
Scissors
Hot glue gun
2 twigs
Scarf
Ribbon (for hat)

Directions:

1. First start by blowing up the ballons. Keep one a little smaller than the other, for the head and the body respectively.

2. Mix glue in water (as much as is comfortable to work with) and start by dipping the yarn in glue mixture and then wrapping it around the balloons. Keep wrapping until they are covered sufficiently but not fully.

3. Sprinkle glitter on wet ballons and let them dry for around 24 hours.

4. Now make a hat using art paper, cutting two circular discs (for the bottom and top of the hat) and a rectangular disc to make a cylinder. Glue the parts to make it look like a hat.

5. Similarly make eyes, nose, face and buttons with art paper.

6. Once the yarn is completely dry, pop the balloon and take it out of the ball.

7. Cut a small circle at the bottom of its head and using a glue gun stick it to the body.

8. Glue the hat. Similarly stick the eyes, nose, smile, and buttons.

9. Insert twigs for hands and tuck in the scarf and your snowman is ready!